 Proudly BC Owned & Operated for over 40 years.
Orchid Care Guide for BC
How to Water, Feed, and Rebloom Orchids Indoors
Orchids have a reputation for being fussy, but most varieties sold in BC, especially Phalaenopsis (moth orchids), are surprisingly easy to care for indoors. With the right light, careful watering, and a little patience, your orchid can reward you with blooms that last months, and then rebloom year after year.
Popular Orchid Varieties
The five varieties below represent the most commonly available orchids at GARDENWORKS, each with its own character. When in doubt, start with a Phalaenopsis.
Phalaenopsis: Moth Orchid
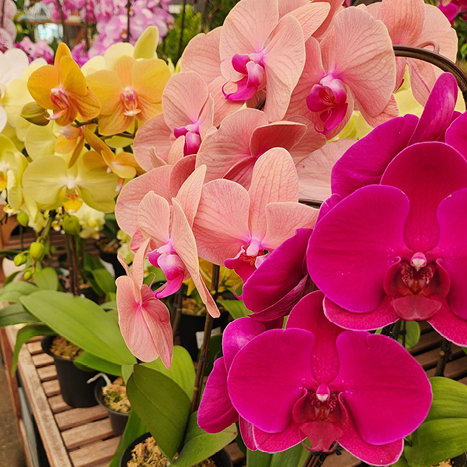
Beginner-Friendly
The most recognizable and widely grown indoor orchid. Phalaenopsis is known for its broad, elegant blooms that can last three to four months or longer, making it one of the longest-flowering houseplants available. An excellent choice for both beginners and collectors.
• Light: Bright, indirect
• Water: Allow to lightly dry between waterings
• Temperature: Warm, consistent household range while blooming
• Fertilizer: Light feeding every 2–3 weeks during active growth when orchid is not in boom
Dendrobium
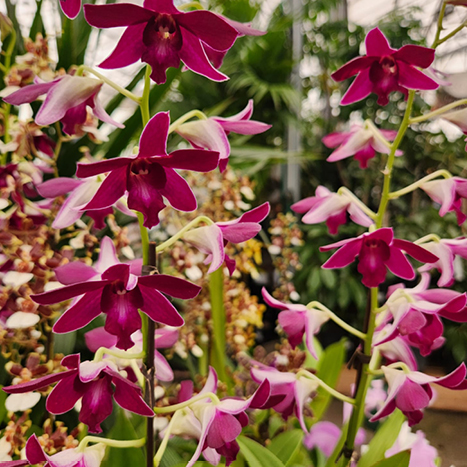
Next Step Up
More architectural in form, Dendrobiums produce clusters of blooms along upright canes, creating a lighter, airy display. A great option for those ready to take the next step beyond Phalaenopsis.
• Light: Brighter than Phalaenopsis
• Water: Moderate; allow a noticeable dry-down between waterings
• Temperature: Varies by type, but generally prefers a slight day/night variation
• Fertilizer: Regular feeding during growth, reduced or stop in rest periods, AKA dormancy
Cymbidium
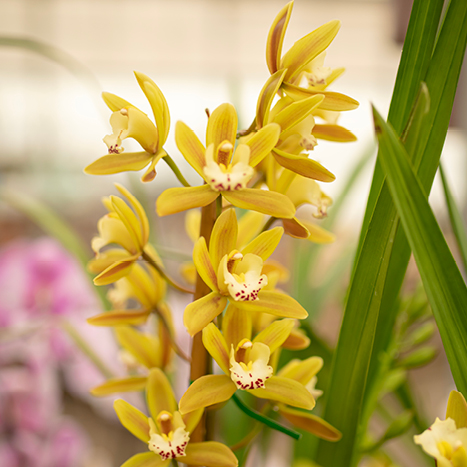
Moderate
A classic orchid with tall spikes carrying multiple blooms, often associated with cooler seasons and elegant, garden-style displays. Ideal for bright, cooler spaces or protected outdoor areas in mild climates.
• Light: Bright, even some direct sun
• Water: Consistent moisture during growth
• Temperature: Prefers cooler nights to initiate flowering
• Fertilizer: Regular feeding in spring and summer
Cattleya: Corsage Orchid
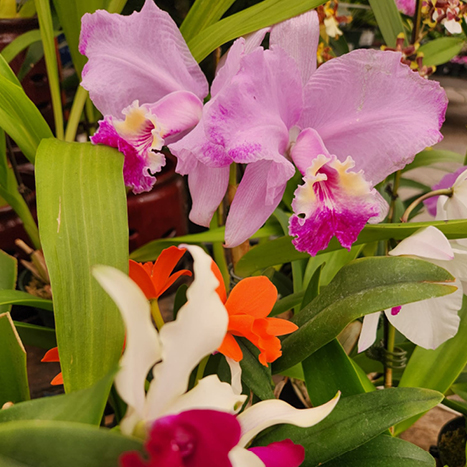
Moderate
Famous for their large, often fragrant blooms, Cattleyas bring bold colour and presence. Bloom time is shorter, but the impact, especially the fragrance, is unmatched.
• Light: Bright light with some direct sun
• Water: Dry slightly between waterings
• Temperature: Warm with good air circulation
• Fertilizer: Feed during active growth
Paphiopedilum: Slipper Orchid
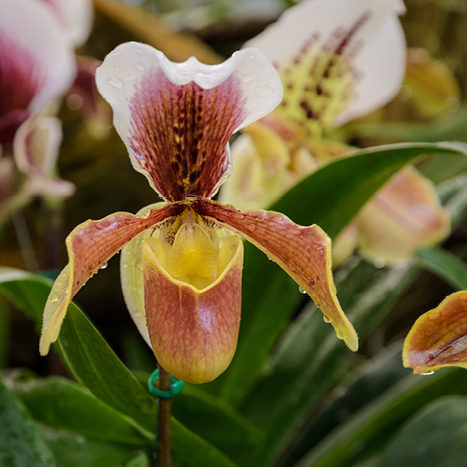
Moderate
Recognized for their unique pouch-shaped blooms and often beautifully patterned foliage. A great choice for lower-light areas and collectors looking for something different.
• Light: Lower to moderate
• Water: Keep evenly moist; no drying out completely
• Temperature: Intermediate, stable
• Fertilizer: Light, consistent feeding
Light
Orchids need bright, indirect light, but the exact amount depends on the type. In their natural habitat, most orchids grow beneath forest canopies, filtered from intense sun. Recreate that in your home and they'll thrive.
Light Levels by Type
|
Light Level |
Best Window |
Orchid Types |
|
High Light |
South-facing, or bright east/west |
Cattleya, Dendrobium, Cymbidium |
|
Medium Light |
East or west facing |
Oncidium, Miltonia, Zygopetalum |
|
Low–Medium Light |
Bright north, or shaded east/west |
Phalaenopsis, Paphiopedilum, Odontoglossum |
|
TIP: READING YOUR Phalaenopsis Too much light: Yellowing leaves, brown tips, or limp foliage. Too little light: Very dark green leaves, sparse or limp growth, and failure to bloom. |
Humidity
Orchids are tropical plants and prefer humidity levels of 50–70%. Most homes, especially in winter when the heat is running, sit around 30–40%. Here's how to improve conditions without turning your home into a greenhouse:
• Group your orchids together: plants release moisture as they breathe, raising humidity around each other
• Place pots on a gravel tray: fill the tray with water but make sure the pot sits above the waterline, not in it
• Mist leaves in the morning, which gives plants time to dry before nightfall, reducing the risk of fungal disease
• Never mist the flowers; only the leaves
|
IMPORTANT Always mist in the morning, not evening. Wet leaves overnight encourage fungal diseases and rot. Remember: more misting means less watering needed; adjust accordingly. |
Repotting
Orchids grow in bark or moss, not soil. Most are epiphytes that anchor onto trees in the wild, drawing water and nutrients through their exposed aerial roots. Over time, bark breaks down and stops draining properly, which is why repotting is necessary.
When to Repot
• Every 18–24 months, or when the potting mix breaks down and stays wet too long
• Repot in spring, or immediately after blooming
• Never repot a blooming orchid or one with an active flower spike, as this often causes flowers to drop
How to Repot
1. Pre-soak fresh bark mix in warm water for several hours before you begin.
2. Remove the orchid and shake or rinse all old media from the roots.
3. Using clean scissors, trim any rotten, mushy, or broken roots. Healthy roots are firm and white or green.
4. If many roots were removed, do not increase the pot size; keep it snug.
5. Place a handful of fresh bark in the bottom of the pot. Spread roots over it.
6. Gently fill in with more bark, working it through the roots.
7. The crown (where roots meet leaves) should sit at the top of the medium, not buried.
8. Place the repotted orchid in a shaded, humid spot for a few weeks. Mist the leaves daily until new root growth appears.
|
CHOOSING A POTTING MIX Bark mixes (fir bark, coarse perlite, charcoal, and peat) are recommended over sphagnum moss alone, as they drain better and are less likely to stay too wet. Fine bark is best for smaller or younger plants; coarse bark suits mature plants. Always check the label for your orchid type. |
How to Get Your Orchid to Rebloom
One of the most common questions we hear at GARDENWORKS: "My orchid finished blooming. Now what?" The good news is that with a little patience and one simple temperature trick, most Phalaenopsis will rebloom reliably.
After the Flowers Drop
1. Cut the old flower spike back to just above the second or third node. A side branch may emerge and produce more flowers. If the spike has turned yellow, cut it off at the base entirely.
2. Continue regular watering and resume fertilizing once blooming has ended.
3. Grow the plant on as normal through summer.
Triggering a New Flower Spike
Phalaenopsis need a drop in night-time temperature to initiate blooming. In the fall, move your orchid to a spot where nighttime temperatures drop to 15–16°C for 4–6 weeks (a windowsill away from the heat is often ideal). Once you see a new spike emerging, move it back to its usual spot and resume normal care.
|
PATIENCE PAYS OFF Phalaenopsis typically bloom once a year, with flowers lasting 2–4 months. Other orchids like Cymbidiums need summer outdoor time (in semi-shade) and cool fall nights to trigger blooms. |
Seasonal Care Calendar
|
Early Spring |
Summer |
Fall |
Winter |
|
Resume fertilizing as growth resumes |
Water more frequently (roots dry faster) |
Allow nighttime temps to drop for Phalaenopsis to rebloom |
Reduce watering; growth is slower |
|
Repot if needed (after blooming) |
Fertilize weekly at 1/4 strength |
Bring Cymbidiums in before frost |
Stop or reduce fertilizing to monthly |
|
Begin taking Cymbidiums outside to semi-shade |
Cymbidiums outdoors in dappled shade |
Reduce fertilizing as growth slows |
Watch for low humidity from heating |
|
|
Watch for pests in warm conditions |
|
Enjoy the blooms! |
Why Orchids Need Special Growing Media
While these orchids vary in appearance and care, most share a key trait: they are epiphytes or semi-epiphytes, meaning they naturally grow on trees or rocky surfaces rather than in soil. This is why drainage and airflow around the roots are so essential: roots that stay wet and compressed quickly decline.
At GARDENWORKS, we carry specialized orchid growing media designed to replicate these natural conditions, typically bark-based mixes that allow roots to breathe while retaining just enough moisture. Repotting into the right medium can make a significant difference in long-term success.
|
THE BIG PICTURE Orchids may come from diverse ecosystems, but in a home setting, success comes down to a few consistent principles: the right light, thoughtful watering, proper growing medium, and a bit of patience. When those pieces come together, orchids become not just manageable, but incredibly rewarding indoor plants. |
Orchid FAQs
My orchid finished blooming. Should I throw it out?
You can. But orchids can rebloom for many years. Cut the old spike back to a node, continue regular care, and give it a cool fall period to trigger new flowering. Most Phalaenopsis will bloom again within 6–12 months.
Why are my orchid's roots turning silver or grey?
This is completely normal. Healthy aerial roots are silvery-grey when dry and turn bright green when wet. If roots are brown, mushy, or shrivelled, they may be rotting; trim these off when repotting.
How do I know when to water my orchid?
The most reliable method: insert a wooden skewer into the potting mix and check it every few days. If it comes out dry, water. You can also check the pot weight: a pot that feels light needs water. Avoid watering on a set schedule, as conditions vary seasonally. Use a GARDENWORKS Moisture Meter for best results.
Why are my orchid's leaves yellowing?
A lower leaf or two yellowing and dropping is normal as the plant matures. If multiple leaves are yellowing, check for overwatering (soggy roots), too much direct sun, or root rot.
What orchid is easiest for a first-time grower?
Phalaenopsis (moth orchid) is the best choice, tolerant of typical home conditions, available in almost every colour, and among the longest-blooming orchids you can grow indoors. Paphiopedilum and Oncidium are also good starter choices.